So I hope to see you all there! Thanks again for the support!

Wednesday, December 19, 2012
It's time my friends...
It has been....well forever since I have posted anything here. I originally started this blog as a way to just keep track of the things that I wanted to do, project ideas, or recipes. And lets be honest... with the invention of Pinterest, I have not needed to post stuff here. So I wanted to give a heads up and just let everyone know. I will keep this blog public and available, I just will not be posting anything new. On that note, if you would like to follow me on Pinterest, you can follow me
Saturday, September 10, 2011
Fall/ Halloween Wreath
So for an upcoming craft night that a friend and I are doing, I was in charge of the wreath project. After scouring and searching for one that was economical AND cute, I was just not IN LOVE with any one. So I decided to combine a few things from some that I liked and create my own! I am loving it so much. I think it turned out really good and it cost a total of about $4 or $5 bucks. You cannot beat that! And sorry, when I took the picture the sun was shining really bright.

You will need:
Small wire wreath frame
1/4 yard of burlap total (I used orange and black, but you can do just one color if you would like)
Hot glue gun and glue
Cheese cloth
Old square frame (I got mine from a garage sale for 10 cents)
Small chalkboard (Joanne's has them 3 in a bag for $1.50)
Craft eye balls (that's what I call them) :)
Some yarn, or ribbon to hang it
So I didn't take pictures of the process because working with burlap is messy and I was covered by the time I was finished. But to start out with you wrap the frame in the cheese cloth and attach it with hot glue. Be very careful because... cheese cloth has holes. :) To create the "web" effect, an easy way is to stick CLOSED scissors randomly in the cheese cloth and open them. So you are not cutting anything. Just using the scissors to move the individual strands around. You can use whatever you want to do this. But scissors make it really easy.
Then I cut the burlap into strips ABOUT 1 inch thick, and about 7 or seven inches long. I really just eyeballed it. Then just tied them on the small wire wreath frame alternating with black and orange. I had to trim a few of the pieces because they were noticeably longer.
Then I used a BOO stamp and white ink for the mini chalkboard, but you can also just write something with regular chalk too. I glued some eyes on there and hung the mini wreath with some yarn and lots of hot glue. Then hung the entire thing with the same yarn on my hook on the door. I was originally going to use some cute ribbon but forgot to get some. :) And I was impatient to hang it. Then voila!!


Tuesday, August 2, 2011
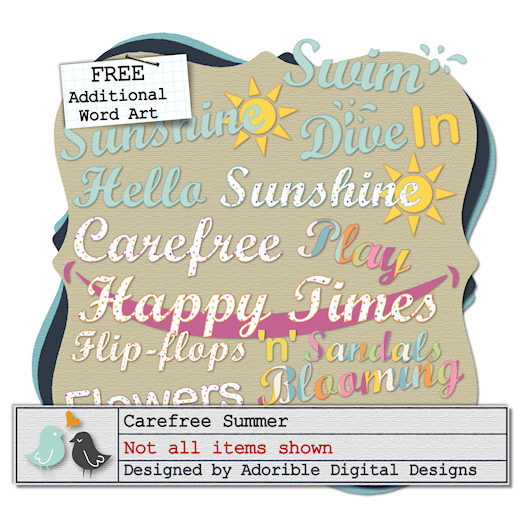
Adorable Digital Designs Release: Carefree Summer
I love this kit for the summer. The colors are just fabulous. Take a look! And it is available over at Adorable Digital Designs. Love the word art.

Here are the layouts that I have done to showcase this awesome kit. Don't you just love the papers?!


And here is my portion of the blog train. Just click on the picture to download. And the next freebie is over at Tia's blog. Click HERE to head over there.

Enjoy and come back again soon!
Thursday, July 14, 2011
Front-Facing Book Display Shelves
I like the rain gutter bookshelves because they are the EASIEST thing in the world. But I kind of like the look of these too. They are just a lot more work. When we have a house, I guess I will decide then which ones I will end up going with. Right now we just have a few rain gutter ones in our house. I really like how they display the books. And the kids REALLY do want to read more because they can see them. Anyways, go HERE to see the tutorial on how to make these. Love them!


Business Card Holder
I know that I have posted before on some other ways to make your own business card holder. But I really liked this one as well and thought I would share. Go HERE to see the full tutorial on how to make it. It really is adorable. Not sure which one I am going to end up going with. But there you go. ;)

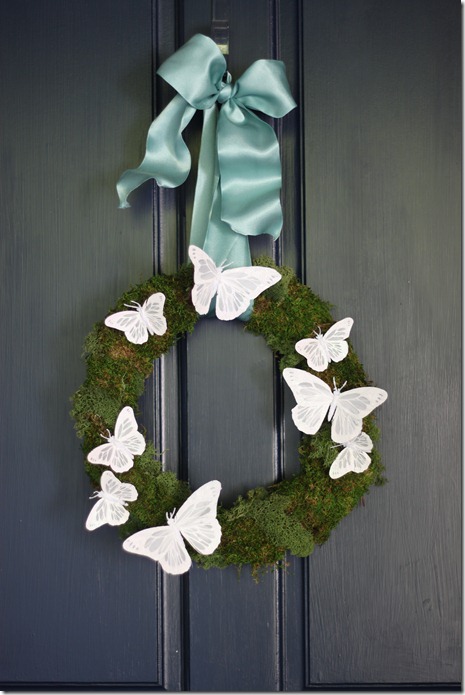
Moss Wreath
I like the ideas that this wreath inspires. I am not the most "butterfly" person. But I think some really cute daisy silk flowers maybe. I just love the moss idea. And it looks pretty easy to do too. Go HERE to see the tutorial.
Ultimate Mom's Cave!!
Is this not the most magical place!! I think it is better than Disney Land. I mean come on people! Talk about my dream mom's cave right there. Go HERE to see the other pictures of this! Seriously, GO. NOW! ;) I am sure your husbands will want to kill thank me later.

Spring Table Runner
I just love this table runner. And I am not normally one for table runners as it usually ends up as just one more super hero cape or what not for my boys. But I LOVED this one. The colors, the easiness simplicity of it. ;) It just makes me happy to look at it. It might even be worth fighting the boys for it. Go HERE to see the tutorial on how to make this.

Wednesday, June 29, 2011
What I am sort of working on...
So I have been super busy processing a few photo shoots trying to get them done. But sometimes I need a break when my photo creative juice is drying up. And today I stumbled upon a color palette that spoke to me. ;) Anyways I had this idea... take a look and tell me what you think. I have no idea why I thought of this theme as my boys are still young. But I had the idea and went with it. Well, just keep in mind this is a work in progress. If there is enough interest, I will do more and offer it for free! :) So be sure to leave a comment and let me know if you would want this. Thanks.


Saturday, June 25, 2011
A little absentminded...
So I know that I have not updated in a while with any new recipes, crafts, or what not. :( Sorry folks! It has just been a little crazy with this, that, and the other. But I will update soon with some good stuff. Stay tuned! :) And just to keep your interest... here is a little treat for you. ;) And yes, I am a little bit dorky.

Tuesday, June 21, 2011
Mister Jack
Head on over to my Photography Blog and check out a photo shoot I did a couple of weeks ago of this adorable little one year old. :)

Monday, June 6, 2011
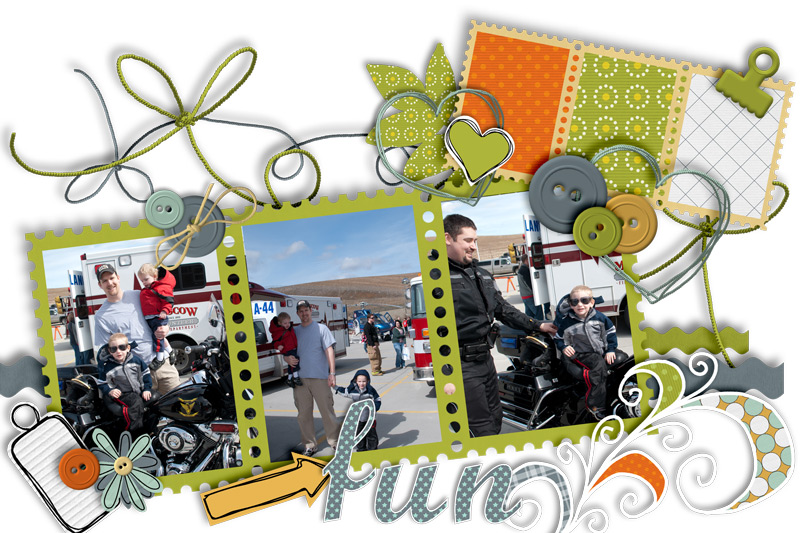
Adorible Digital Designs Kit Release: Every Woman
Today Adorible Digital Designs has come out with a new kit called Every Woman. I love the girliness of this kit. With two boys you can guess that most of my kits are dirt and boy themed... So this kit was just in time as I was feeling a little "blued" out. :) I think my favorite element is the splatter of eyelets. I love it! Here is a preview of the kit. And be sure to check out Every Woman for purchase over at Louise's shop. And be sure to enter her contest for a chance to win this fabulous kit for FREE!

 And here is my layout that I did. So cute if I do say so myself! :)
 And here is my portion of the free blog train. Some great desktops! Just click on each picture to download them. And then click HERE to head over to Tia's for her portion and the next freebie! Enjoy! And don't forget that the blog train freebies are only free for the next week. After that you can check them out at Adorable Digital Designs. ********UPDATE: Link removed. Freebie expired. Please visit Adorable Digital Designs to purchase this great kit.


Monday, May 23, 2011
Adorable Digital Designs Kit Release: Be Inspired
The newest kit Be Inspired from Adorable Digital Designs was released TODAY! I love this kit. It is one of my new favorites. I think the color scheme and the word art is my favorite aspects of this gorgeous new kit. Check it out! And you can click HERE to head over there to purchase this fabulous kit.


Here is the latest of what I have done using this kit:


And you lucky ducks get to download this free cluster as my part of the blog train. ;) YAY!!
Here is the preview:
So click HERE to download. And head on over to Tia's blog Creative Chaos to pick up the next little freebie. Thanks for stopping by! And don't forget, this freebie is only available for the next 7 days! So hurry and download it and tell your friends to hurry so that you can all enjoy it. After that they will be available for purchase at Adorable Digital Designs.
Tuesday, May 17, 2011
I was featured!!
Head over to Adorable Digital Designs to see the awesome tutorial I did. You can even grab this paper pack freebie.

Enjoy!
Monday, May 9, 2011
Adorable Digital Designs Kit Release: Playful
I have to say I am IN LOVE with this new kit Playful that Adorable Digital Designs just came out with. I had so much fun creating my pages with it! Here is a preview of what the kit looks like. And you can get it by clicking HERE. I just love the bright colors of this kit, don't you! You can also WIN THIS KIT FOR FREE by heading over HERE and leaving a comment.
***UPDATE: Contest ended, link removed***
***UPDATE: Contest ended, link removed***


And here is a few pages that I created using this great kit:


******UPDATE: Link removed. Come back again for the next freebie we will offer. In the meantime, if you would like to purchase this kit, go HERE.*******
And for my portion of the free quick page blog train click HERE for the download. And here is a preview:
 And the next stop is over at Tia's blog Creative Chaos. So head over there to get her quick page freebie. And remember that these are only offered for free for the next 7 days, after that they will be available for sale at Adorable Digital Designs. And you can go there now to purchase this Playful Kit. And don't forget to enter to win this kit for FREE! CLICK HERE TO ENTER.
Have fun! The creative possibilities are endless.

Have fun! The creative possibilities are endless.
Monday, April 18, 2011
Adorable Digital Designs Kit Release: Carnival
The newest kit comes out TODAY from Adorable Digital Designs! I absolutely love this new kit. And it is versatile enough to use on some of your everyday scrapbooking pages as well, not just on "Fair/Carnival" events. Here is a preview of the kit that comes out today and the cluster that I designed for the Cluster pack that goes on sale today as well. And be sure to check at the bottom of this post for my freebie portion of the blog train. :) It is only free for 7 days and after that it will be available at Adorable Digital Designs for purchase. So grab it while its hot! ;)
****Update: If you want the Brag book it is available for purchase at Adorable Digital Designs.


My layout example using the cluster I designed and the Carnival kit! I had so much fun with the wonderful kit!

And for my portion of the blog train brag book, click on the link below! Enjoy!
Kassy's Brag Book Page
Here is a preview of what I did with it. :)
*******UPDATE: Link removed. It is now available for purchase at Adorible Digital Designs.

Here is a preview of what I did with it. :)
*******UPDATE: Link removed. It is now available for purchase at Adorible Digital Designs.

And for the next freebie on the blog train,
go HERE over at Creative Chaos to get Tia's free brag book page!
"I hope you enjoyed participating in the blog train. For anyone who come on board a little late and missed the freebies, you can purchase the items in store from today at Adorable Digital Designs. Make sure you get your freebies next time by joining our blog train from 9th May...remember, the freebies will only be up for one week before being added to the store, so be quick!
"I hope you enjoyed participating in the blog train. For anyone who come on board a little late and missed the freebies, you can purchase the items in store from today at Adorable Digital Designs. Make sure you get your freebies next time by joining our blog train from 9th May...remember, the freebies will only be up for one week before being added to the store, so be quick!
Saturday, April 16, 2011
My siggi!

Isn't it great?! I just love what the very talented Louise designed for me over at Adorable Digital Designs. Head over there and you can pick any of her kits and she will design a custom Siggi for you with whatever links you want. And be sure to check at her other products that she offers while you are there. Thanks Louise!
Wednesday, April 13, 2011
Easy Bisquick Meals & Snacks
Roasted Vegetable Egg Bake
Ham Chowder with Rolled Parmesan Biscuits
Frosty Snowmen Pastry's
Cinnamon Bubble Loaf

Cinnamon Bubble Loaf
Prep: 10 min Bake: 30 min
Ingredients:
2 tbs sugar
1 1/2 tsp ground cinnamon
3 1/2 cups Bisquick
1/2 cup milk
1/3 cup sugar
3 tbs butter or margarine, softened
1 tsp vanilla
1 egg
2 tbs butter or margarine, melted
Powdered Sugar Glaze
1/2 cup powdered sugar
2 to 3 tsp water
1. Heat oven to 375. Grease bottom and sides of loaf pan, 9x5x3 inches, with shortening or spray with cooking spray. Mix 2 tablespoons sgar and the cinnamon;set aside.
2. Stir Bisquick mix, milk, 1/3 cup sugar, 3 tablespoons butter, the vanilla and egg in medium bowl until soft dough forms. Shape dough into 1 inch balls; roll in cinnamon-sugar; drizzle melted butter over dough balls.
3. Bake 25 - 30 minutes or until golden brown. Let stand in pan 10 minutes. Remove from pan to wire rack. Make Powdered Sugar Glaze; drizzle over loaf. Cut into slices. Serve warm.
Powdered Sugar Glaze: Mix ingredients until thin enough to drizzle.
*High Altitude (3500-6500): Bake 33 to 38 minutes.
Orange-Almond Streusel Muffins

Orange-Almond Streusel Muffins
*Betty Crocker-Bisquick Recipe
Prep: 15 min Bake: 15 min
Ingredients:
1 teaspoon grated orange peel
1/2 cup orange juice
1/3 cup packed brown sugar
1/4 cup vegetable oil
1 egg
2 cups Bisquick mix
1/4 cup sliced almonds
Streusel Topping Ingredients:
1 tablespoon Bisquick mix
2 tablespoons packed brown sugar
2 tablespoons sliced almonds
1 tablespoon butter or margarine
1. Heat oven to 400. Line 12 muffin pan with paper baking cups; or grease bottoms only of muffin pan with shortening. Make Streusel Topping; set aside.
2. Mix orange peel, orange juice, brown sugar, oil and egg in large bowl. Stir in Bisquick mic just until moistened. Stir in almonds. Divide batter evenly among muffin cups. Sprinkle with topping.
3. Bake 13 to 15 minutes or until golden brown. Immediately remove from pan to wire rack. Serve warm.
STREUSEL TOPPING:
Mic Bisquick mix, brown sugar and almonds in medium bowl. Cut in butter, using fork, until crumbly.
*High altitude (3500 to 6500 feet): Use 3/4 cup orange juice and 2 tablespoons oil. Bake 14 to 16 minutes.
Chicken Pot Pie

This recipe is from a Betty Crocker-Bisquick recipe. So yummy and so easy to do. I loved that it did not require that much prep time. Great weekday meal. :) Just trust me on the yumminess!
Chicken Pot Pie
Prep: 15 min Bake: 40 min Servings: 6
Ingredients:
1 Package (16 oz.) frozen mixed vegetables
1 cup cut up cooked chicken
1 jar (12 oz) chicken gravy
2 cups shredded Wisconsin Cheddar (or regular) cheese (8 oz)
1 cup Bisquick mic
1/4 cup milk
1/4 cup dried thyme
2 eggs
1. Preheat oven to 375. Heat veggies, chicken and gravy to boiling in a large sauce pan, stirring frequently; keep warm.
2. Stir cheese, Bisquick, milk, thyme, and eggs with a fork until blended. Pour chicken/veggie mixture into ungreased casserole pan. Pour batter over chicken mixture.
3. Bake 35-40 minutes or until crust is golden brown. Let stand 5 minutes before serving.
Thursday, April 7, 2011
The latest and greatest!!
You are looking at the newest CT (creative team) member for Adorable Digital Designs and for Amanda & Millie Designs. They are very talented and I love the digital scrapbooking kits that they come out with. And Louise of Adorable Digital Designs also does custom blog designs over at her other site Adori Graphics. Go and take a look at these very talented ladies.
So you will be seeing, in addition to crafts, baking, and what ever else I want to put on here, ;) You will see some of the layouts that I create for these two sites, and also I will let you know when they have their kits available! So excited and cannot wait to show you all!
Friday, March 25, 2011
Go check this out!
Go check out this awesome giveaway!
http://florabellacollection.com/blog/2011/03/25/florabella-theit-camera-bag-giveaway/
http://florabellacollection.com/blog/2011/03/25/florabella-theit-camera-bag-giveaway/
Wednesday, March 16, 2011
Repurposing: Shirt into Skirt with Yoga Style Waistband

*Photo by Make It and Love It
This looks so cute and adorable. Maybe it is just because I am surrounded by testosterone in my house and I was in the mood for some girly thing. But this is cute and green! If you already have a shirt that would work, it would not cost you a dime! Anyways, moving on. :) Head over to Make It and Love It to see the tutorial on how to make this Repurposing: Shirt into Skirt with Yoga Style Waistband.
Lens Pets

*Photo by mandeefrandee's Etsy Shop
I love this idea. I am always having trouble with shoots with kids as their attention span wonders. This would be a life saver! And they would be so stinkin' easy to make. Now you could just buy them from this ladies Etsy shop. But I would like to just make my own and customize it how I want to. There are also other ideas on her shops page of other animals.
Baby Sleep Sack

*Photo by Running with Scissors
I do not know if there is something in the water or what, but I have been going to a lot of baby showers lately. So I am always looking for cute, original, inexpensive gifts. I thought this was adorable and you can pick colors to make it more masculine if a boy is what is expected. So head over to Running with Scissors for the tutorial on how to make a Baby Sleep Sack.
5 Minute Brimmed Beanie

*Photo by Delia Creates
I love how cute these hats are on little boys. I really want to do matching ones for my two terrors. :) Head over to Delia Creates to see her tutorial on how to make this super easy 5 Minute Brimmed Beanie.
Lemon Bundt Cake with Lemon Syrup

*photo via the Tasty Kitchen & Pioneer Woman
I really would like to try these. Head over to The Tasty Kitchen/Pioneer Woman to see the original post on how to make this Lemon Bundt Cake with Lemon Syrup.
Lemon Bundt Cake with Lemon Syrup
Ingredients
- FOR THE CAKE:
- 2-¾ cups Cake Flour
- 1 teaspoon Baking Powder
- ½ teaspoons Baking Soda
- ½ teaspoons Salt
- 1 cup Sour Cream
- 1 Tablespoon Grated Lemon Zest
- ¼ cups Lemon Juice
- 1 teaspoon Vanilla Extract
- 2 cups Granulated Sugar
- 1 cup Unsalted Butter, Soften
- 4 whole Large Egg
- _____
- FOR THE SYRUP:
- ½ cups Lemon Juice
- ½ cups Granulated Sugar
- ¼ cups Water
Preparation Instructions
Preheat oven to 350ºF. Generously grease and flour a 10-inch bundt pan.
In a large bowl, sift the flour, baking powder, baking soda and salt.
In another bowl, whisk sour cream, lemon zest, lemon juice and vanilla.
Beat butter and sugar together on medium speed in a bowl of a standing mixer until light and fluffy. Beat in eggs, one at a time, until blended.
Reduce the speed to low and beat in 1/3 of the flour mixture, followed by half of the sour cream mixture. Repeat with another 1/3 of the flour mixture and the remaining sour cream mixture. Beat in the remaining flour mixture until just incorporated.
Pour the mixture into the prepared bundt cake pan and spread evenly.
Bake for 40 to 50 minutes or until a wooden pick inserted in the cake comes out clean. Cool in the pan on a wire rack for about 10 minutes before inverting on rack.
To make the lemon syrup, bring the lemon juice, sugar and water to a boil in a small saucepan. Reduce heat to medium, then let it simmer uncovered for 10 minutes until it becomes syrupy and light brown color. Brush the syrup over the warm cake.
Sweet Cinnamon Scones

*Photo by the Pioneer Woman
These look so yummy! I have never before made scones... not sure why because these look delicious! Head over to The Pioneer Woman to see the step by step pictures with instructions to make her Sweet Cinnamon Scones.
Sweet Cinnamon Scones
Ingredients
- 3 cups All-purpose Flour
- ⅓ cups Sugar
- 5 teaspoons Baking Powder
- ½ teaspoons Ground Cinnamon
- 2 sticks (1 Cup) Unsalted Butter
- ¾ cups Heavy Cream
- 1 whole Egg
- 1 teaspoon Vanilla Extract
- 1 cup Cinnamon Chips
- Topping
- ½ cups Sugar
- 1 teaspoon Ground Cinnamon
- 1-½ teaspoon Heavy Cream
Preparation Instructions
Preheat oven to 350 degrees.
In a large bowl, mix together flour, 1/3 cup sugar, 1/2 teaspoon ground cinnamon, and baking powder. Cut butter into pieces, then cut into dry ingredients with a pastry cutter until mixture resembles coarse crumbs. Stir in cinnamon chips.
Mix together cream, egg, and vanilla extract. Pour into flour/butter mixture, stirring gently with a fork to combine.
Turn onto work surface (mixture will be very crumbly and falling apart.) Gently press together on the sides as you flatten (or roll, with a rolling pin) the top. Form either into a large circle or a large rectangle. Mix together topping ingredients, stirring with a fork. Sprinkle over the top of the dough, lightly pressing.
Cut into wedges (from a circle) or triangles (from a rectangle.) Transfer to a cookie sheet and bake for 20 to 25 minutes. Allow to cool completely.
Easy Creamy Coleslaw

*Photo courtesy of The Pioneer Woman & Tasty Kitchen
Now I am not the biggest fan of Coleslaw. But I have to have it with my BBQ sandwiches. Have to! And this looks really easy and I usually have most of the ingredients on hand. Anyways, if you want to see the original posting, go over the The Pioneer Woman. I love this lady!
Easy Creamy Coleslaw
Easy Creamy Coleslaw
Ingredients
- ¾ cups Best Foods Mayonnaise (flavor Is Best With Full-fat Mayo)
- 2 Tablespoons Sour Cream
- 2 Tablespoons Onions, Minced
- 2 Tablespoons Sugar
- 2 Tablespoons White Vinegar
- 1 teaspoon Dry Mustard Powder
- 2 teaspoons Celery Salt
- 1 package (about 14 Oz.package) Coleslaw Salad Mix, Cabbage And Carrot Mix
- Salt And Pepper, to taste
Preparation Instructions
1. Whisk together the mayonnaise, sour cream, onion, sugar, vinegar, mustard, celery salt.
2. Place cabbage mixture into a medium bowl. Pour dressing over cabbage mixture and mix well. Add salt and pepper to taste.
2. Place cabbage mixture into a medium bowl. Pour dressing over cabbage mixture and mix well. Add salt and pepper to taste.
Subscribe to:
Posts (Atom)